Manually
-
Create a Root Cause (Reason code in the users view)
-
Create a new Category
-
Create a new Responsibility value
-
Create the Downtime Code
-
Assign the downtime to a Work Centre
Import
-
Download the template and import
This article explains how to add a new downtime code in the Line Stop Event.
If you already have a root cause, category, or responsible, you can reuse the existing values in the system.
This guide can also be used to make changes. Instead of adding new information, open an existing entry and select Update from the menu.
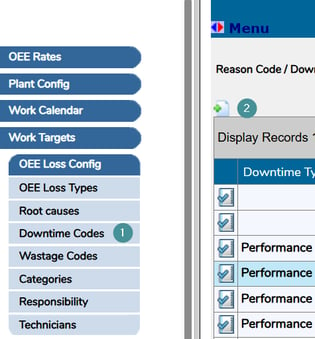
The image below shows where the information is displayed in the system.
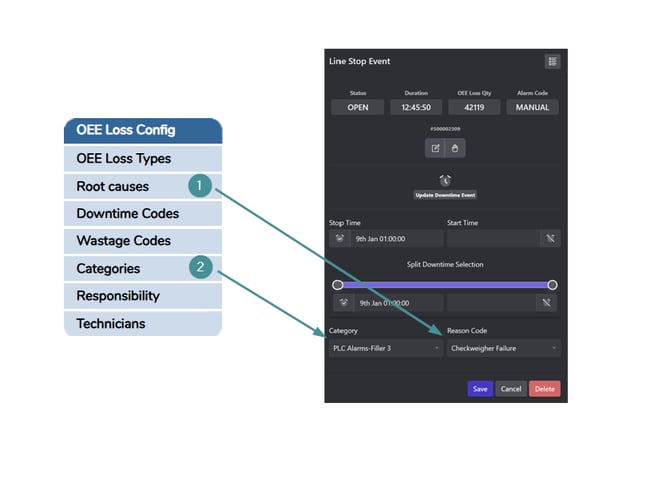
First we create the Root causes
Option 1: Add a downtime code manually
Step 1: Create a Root Cause (Reason Code)
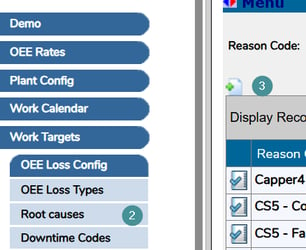
1. Open to System settings → Manager
2. Go to OEE Loss Config → Root causes.
3. Click "Add New"
Fill in the fields:
4. Reason code
-
-
-
Description of the downtime (this is what operators see).
-
-
5. Downtime type
-
-
-
Select the correct type.
-
-
6. Multiple events per order
-
-
-
Yes: Can be selected multiple times per order.
-
No: Can only be selected once per order.
-
-
7. Active
-
-
-
Yes: Available for selection.
-
No: Hidden, not in use.
-
-
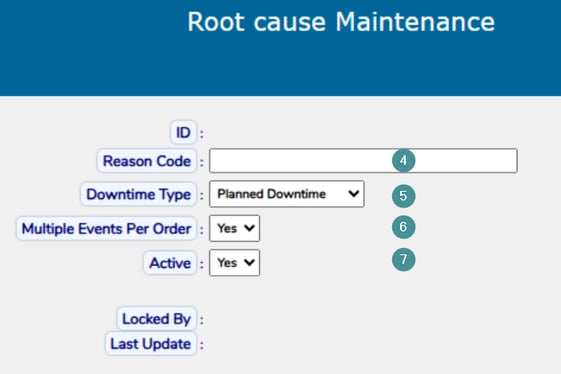
8. Click "Save".
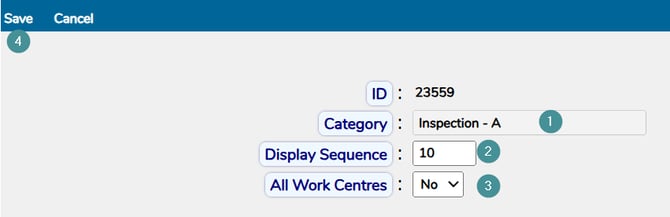
Step 2: Create a new Category
1. Go to OEE Loss Config → Categories.
2. Click "Add New".
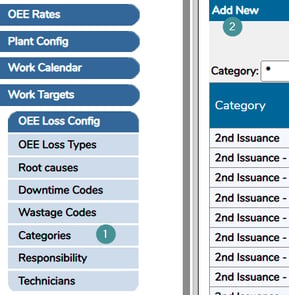
3. Enter a Category name (shown to operators).
4. Enter Display sequence "1" to show this category first in the dropdown list on the downtime maintenance page.
5. All Work Centres:
-
Recommended: Leave this set to No by default.
Select Yes if the category should be available for all Work Centres.
4. Click "Save".
Step 3: Create a new Responsibility value
1. Go to Responsibility → Click "Add New".
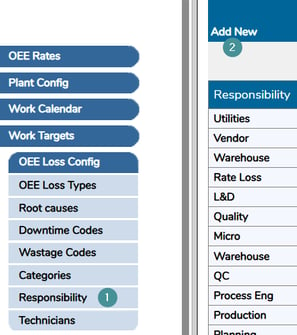
2. Enter a Responsibility name, for example:
-
Operations
-
Engineering
-
Quality
3. Click Save.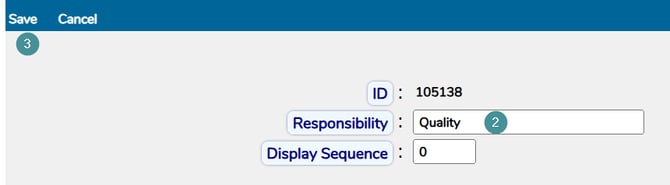
Step 4: Create the Downtime Code
1. Go to Downtime Codes → Click Add New.
Fill in the fields:
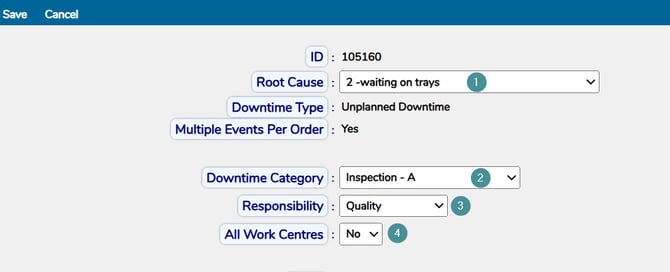
2. Root cause (Reason code in the users view)
-
-
Select the root cause created earlier.
-
3. Downtime category
-
-
Select the category created earlier.
-
4. Responsibility
The field Responsibility is required and cannot be left blank.
The purpose of the Responsibility field is analysis and ownership. It makes it possible to see which team is responsible for addressing recurring issues and to analyze downtime costs by area.
In larger organizations, this allows teams to identify patterns (for example repeated corrective maintenance) and take action such as preventive maintenance or equipment improvements. In smaller organizations, a single group is often sufficient.
5. All Work Centres
-
-
Leave No (recommended).
-
Setting this to Yes makes the downtime available on all Work Centres and can cause issues in multi-site or multi-language systems.
-
Leave all other settings as default.
5. Click "Save".
To add more reason codes, in the users view, to the same downtime category, reuse the existing downtime category and select a different root cause.
Step 5: Assign the downtime to a Work Centre
1. Go to Downtime Codes.
2. Click the "Edit" icon on the downtime.
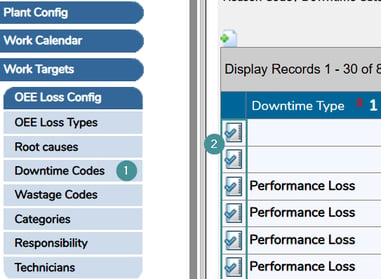
3. Open the "Work Centres" tab.

4. Click Add New icon and select the Work Centre where the downtime should be available.
5. Click "Save".
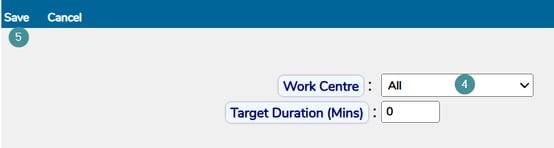
The code will now be available for a specific work Centre.
Option 2: Import downtime codes (recommended for many codes)
Download the template
You can get the template file by:
-
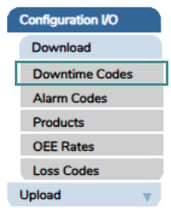
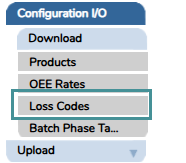
Open to System settings → Manager → Configuration I/O → Download → Downtime Codes or you can find them downtime in Loss Codes depending on OEE version (In loss Codes you find both where downtime have the alarm number as 0 only), or
-
Emailing support@oeesystems.com and requesting the downtime import template.
Fill in the template
Each column represents a database field. Follow these rules carefully.
If you are importing data that includes values already in the system (for example, a Downtime type), make sure the spelling exactly matches the existing value. If it does not match, the system may create a new entry or the import could fail.
Required columns:
-
Column B – Reason Code Description
-
Description of the downtime (root cause).
-
-
Column C – Reason Code
-
Must match the Reason Code Description exactly.
-
-
Column D – Downtime Type
-
Example: UD, PD, ID. (Unplanned downtime, Planned downtime)
-
-
Column E – Category
-
First choice shown to the operator.
-
-
Column F – Work Centre ID Name
-
Found in System settings → Manager → Plant Config → Work Centres or Plant Watch.
-

-
Column G – Responsibility
-
Example: Operations, Engineering, Quality.
-
- Column K – Display On LineStop DropdownList
- Needs to be set to 1 in order to map the downtime code to the work centre and display in the dropdown list when reassigning downtimes
Leave all other columns with their default values.
Save the file
From version 2026.01
-
Go to File → Save As.
-
Select Excel Workbook (*.xlsx).

Import the file
-
Open Manager → System Settings.
-
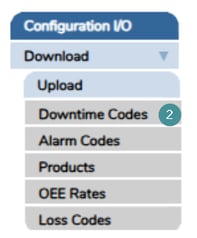
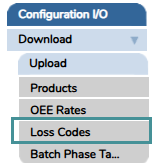
Navigate to Configuration I/O → Upload → Downtime Codes or Loss Codes depending on the OEE version you have as mentioned under "Download Template".
-
Click Choose File and select your file.
-
Click Upload.
After the import, the downtime codes will be available according to the configuration in the file.